- +4527976587
- mail@worldofshortgame.com

Tag Archive chipping

5 Reasons Why You Are Shanking Chip Shots
5 Reasons Why You Are Shanking Chip Shots
(And how to fix it)
I think most golfers will agree, when I say that a shanked chip is a terrible shot to hit. In the following I will teach you the 5 most common reasons why you are shanking chip shots, and in the end I will reveal the best and most simple way to fix this issue. Lets get started.
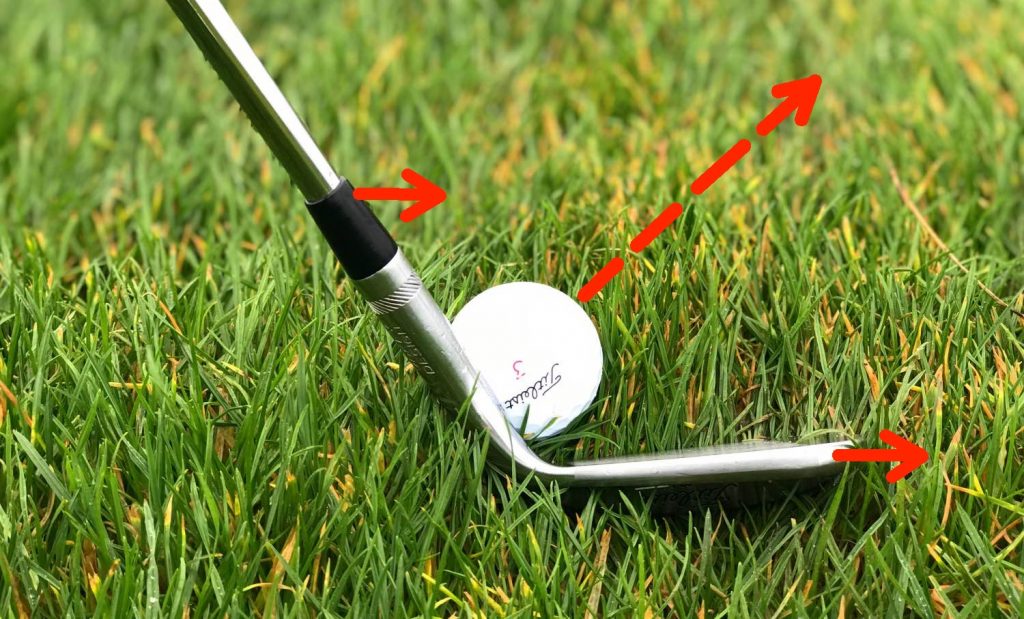
What is a shank at all?
The simplest way to explain why you are shanking chips shots is that the clubhead has been moved closer towards the ball than were it started to be. This will cause the strike point on the clubhead to be on the hosel (learn what the hosel is here) of the wedge, and that is a shank.
1. Check your Setup!
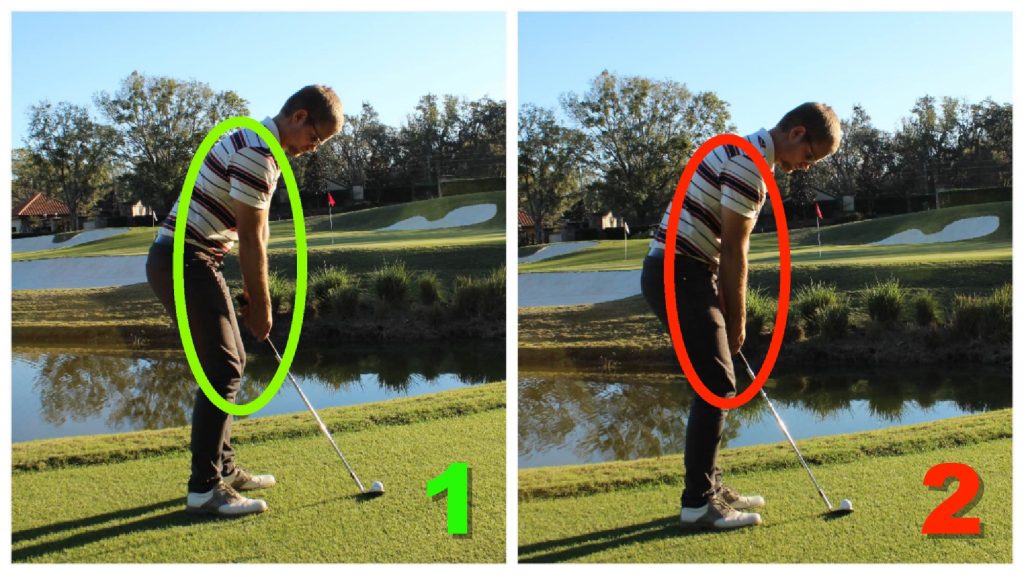
A very common reason to a shank starts already at setup. If you are to close to the ball before starting your motion, there is a great chance of the club moving away from the body due to the lack of space through the impact zone.
A good guideline for most players is that from a relaxed, bend forward position, the arms should be hanging straight down from the shoulders.
Use a mirror or your smartphone to check your setup position.
2. Where is your weight going?
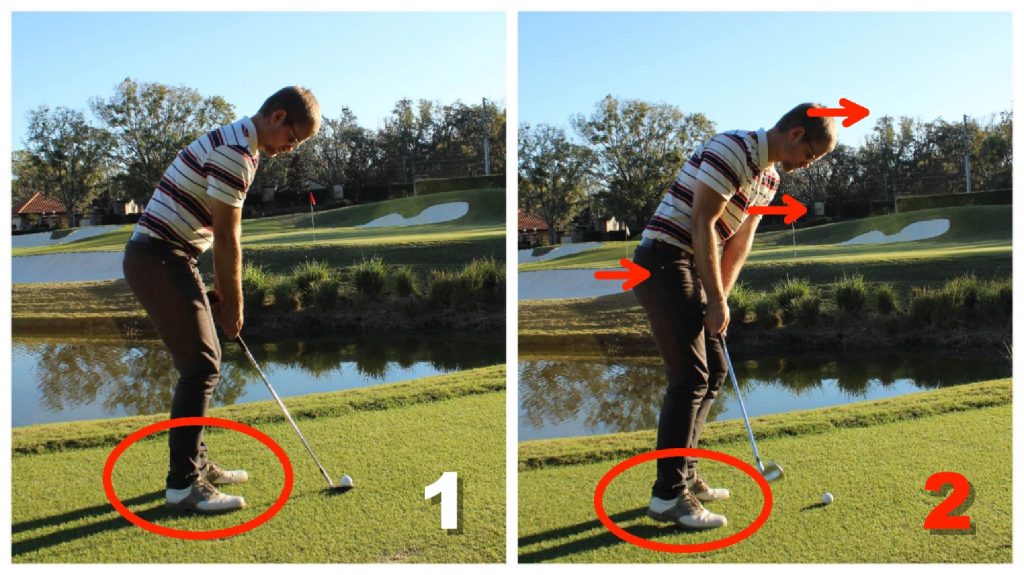
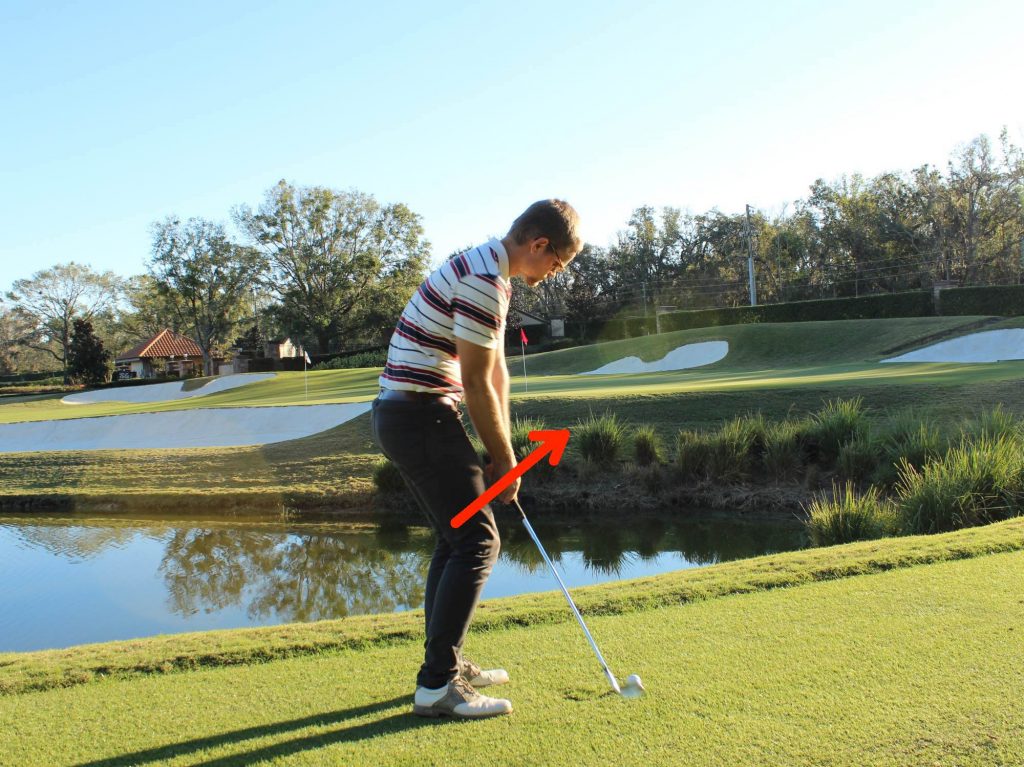
The second very common reasons why you are shanking chip shots, is that the weight of your body moves towards the ball during the chipping motion. Often this can be felt in the shoes, where the weight will move towards the toes.
In order to prevent this, try chipping with your toes pressed up towards to inside top of your shoes.
3. Is you head going the wrong way?
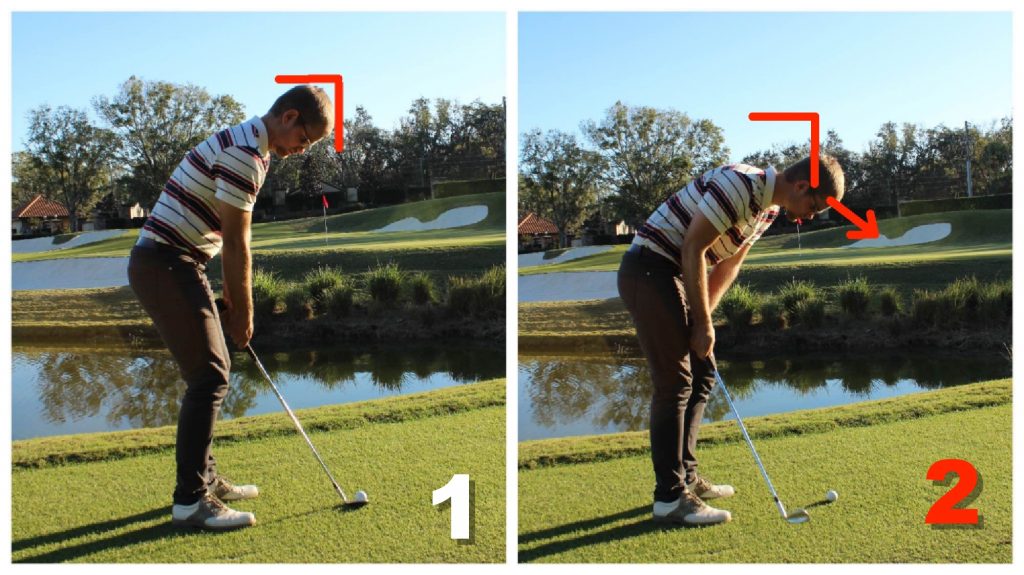
A third very common reason to a shank is when the head moves towards to ball during the chipping motion. The head is the center of the swing and when the head moves in a certain direction, there is a great chance of the clubhead following. Therefore, make sure to keep the head still during the motion.
This might surprise you:
If the head should move anywhere, it should move up, and away from the ball a little bit. This is actually movements you will see many of the best chippers in the world perform. These head movements start already during the downswing.
4. Keep your arms close!
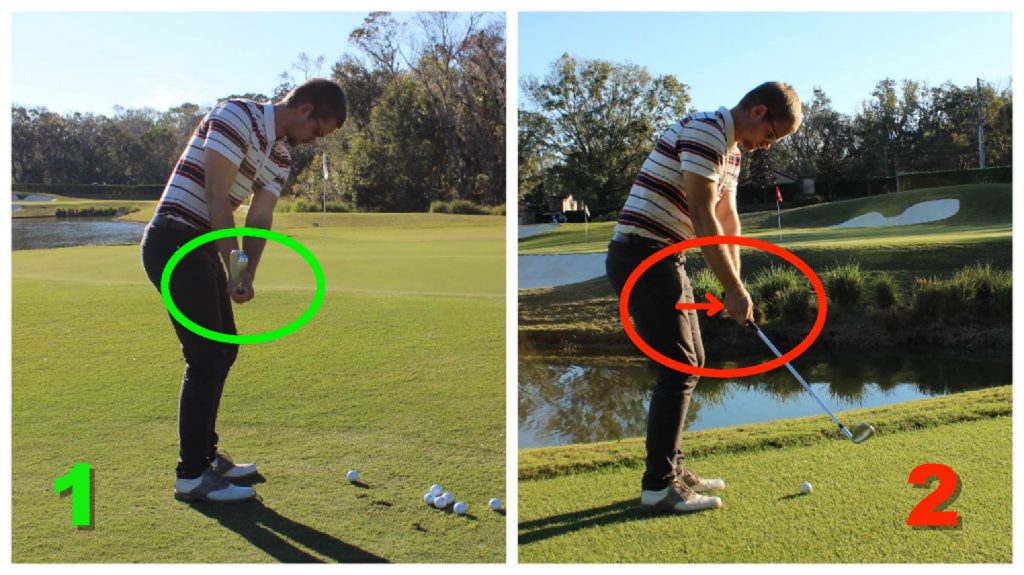
The fourth often seen mistake that causes shanking, is that the arms moves further away form the body during the motion. When this happens, the shaft of the club is moved closer towards the ball, and it will in many cases cause a shank. Make sure that you arms and hands is the same distance away from your body at impact, as they where at setup.
This can be hard to fell for the player. A good way to check this is by using the camera in you smartphone. When watching the video of the motion, it will be quite clear, if the hands and arms have moved further away form the body at impact relative to their position at setup.
5. Check your handpath
The last common reason for a shank is a bit more complicated than the first 4. We are now talking about a path, more specific the path that the hands travel on during the impact zone. If this path is moving too much to the right, for too long time, there is a great risk of hitting a shank.
To illustrate this hand-path, watch the video below, it is the 5th reason presented in the video.
Watch a video demonstrating the 5 reasons
The easiest way to fix a shank
The absolute easiest way to fix a shank, is by doing the following drill:
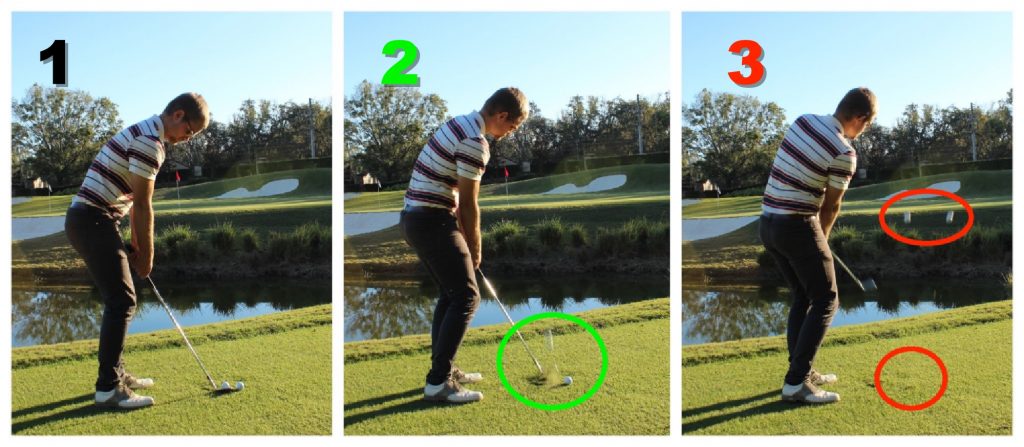
Place two golfballs, with a little less than a golfball size in-between, as shown on the left picture below. The goal is to hit the front ball, and DONT hit the rear ball during the shot. This will insure the clubhead is not moving away from the player which is what causes the shank.
Dont forget!
You’ve now been through the 5 most common reasons why you are shanking chip shots. Other reasons do exists, and if your interested in knowing more about the basis technique of a chip shot, I would highly recommend studying the 9 Best Chipping Tips For Instant Better Performance Around the Green.

9 Best Chipping Tips For Instant Better Performance Around the Green
9 Best Chipping Tips For Instant Better Performance Around the Green
I think you will agree with me when I tell you…
That when chipping, you will never hit the ball as close to the hole as you want, if you don’t have 100% control over the contact with the ball. With these simple, yet enormous effective 9 best chipping tips, your contact with the ball will be better than ever, and you will knock the ball closer to the hole as you’ve always dreamed of!
One thing to remember: This technique is for a very “standard/basic” mid height trajectory chip shot. Endless variations of the following 9 components of this shot will and should be made in the short game in order to fit the shot to the situation.
All 9 best chipping tips are equally important, so keep on reading to the bottom!
1. Build the right foundation.
With a setup that matches the intended shot, you will have the greatest chance of hitting a solid chip, and why wouldn’t you give yourself the best odds.
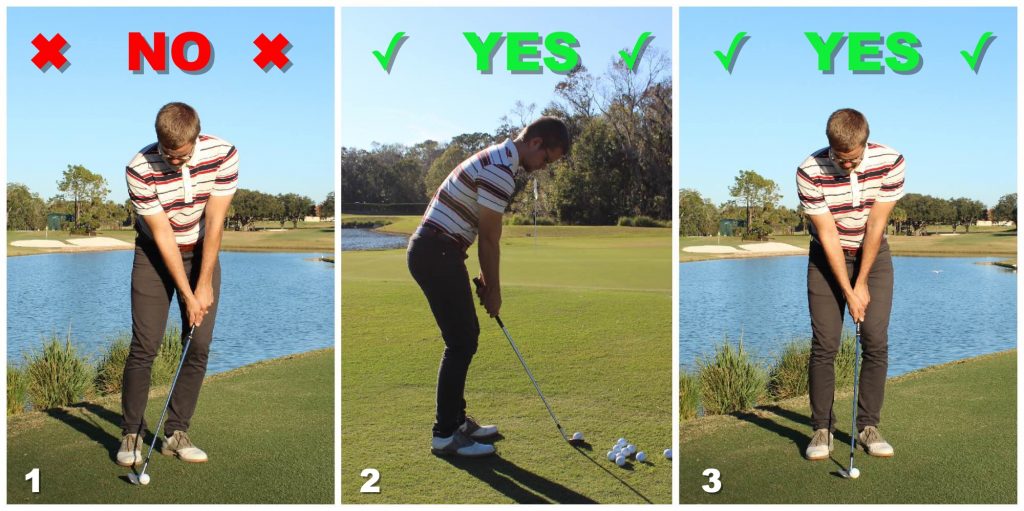
Lets look at the pictures below.
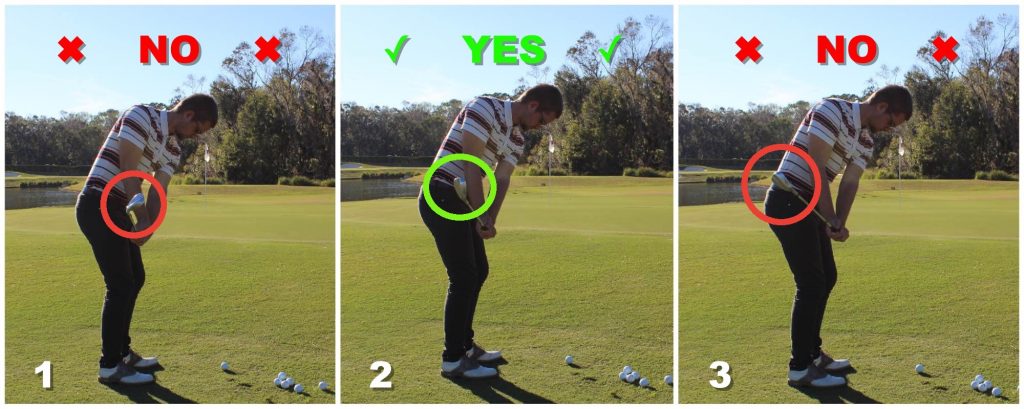
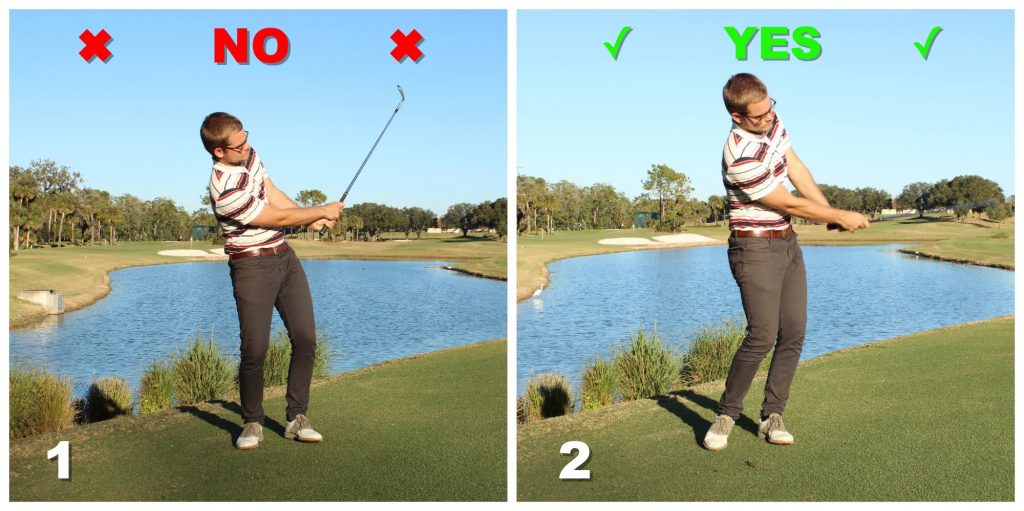
On the 2 pictures to the right, you will se how a proper setup for a basic mid-trajectory shot should look like. A few things is to notice here:
• The ball is located just underneath the sternum of the player.
• The hands are located just inside the left thigh of the player
• The weight is distributed 55% on the left foot and 45% on the right foot.
But why are those 3 things important?
These 3 things combined will create the proper shaft lean (shaft angle) at setup, which will create the right conditions for the club to glide over the ground at impact. This is what its all about. Picture nr. 1 is the WRONG way to setup if you try to achieve this gliding motion of the club.
Other things to notice at the setup are:
• Hells about a clubface wide apart, left toe turned out about 30 degrees.
• Very relaxed arms and hands
• Body is in a relax position.
2. Which way are you swinging?
With the right setup established, lets move on to nr. 1 out of 2 key elements in the backswing. If you don’t swing the club back along the swing plane, you’re making it a lot harder than necessary.
You might be wondering:
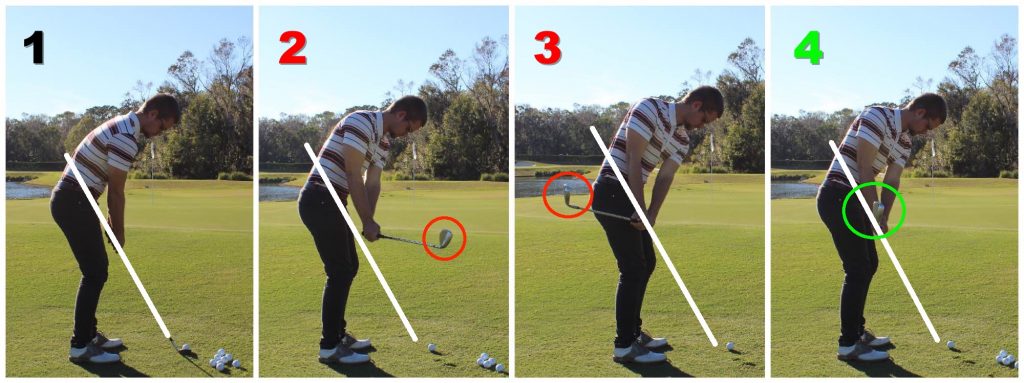
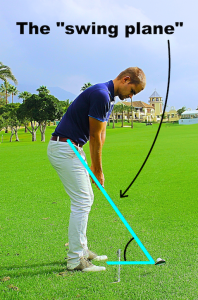
What is the swing plane? The swing plane is the angle that the shaft of the club creates at setup, seen from what we call ”down the line” view. Look at picture nr. 1 below:
This line drawn on picture nr.1 is the swing plane. This is the line that the clubhead should travel up along in the backswing.
In order to swing the club the right way back, as shown on picture nr.4 , here is what to do:
• The wrist can move in 3 different ways, and these 3 different directions must be coordinated on order to swing the club back along the swing plane.
• The amount of rotation in the body must match those wrist movements.
But how is that done?
Good question! It can be hard for the player alone to practice this. But 2 things can be done:
• Use a camera (smartphone) to record your swing from DTL view.
• Use the drill shown below
3. An open face is a happy face
The second key element in the backswing of a chip is the clubface. More specific, how the leading edge of the club is aligned compared to the ground. You NEED to allow the clubface to open up during the backswing. Here is why:
• An open clubface creates the right conditions for the sole of the club to glide over the ground at impact, instead of the leading edge digging.
• An open clubface allows you to release the club properly.
Now you know why you must do it. Now you just need to know how. This can be a little bit trickier, because the opening of the clubface can happen in different ways. Here are the 2 most common ways to do it:
1. Open the clubface already at setup.
2. During the backswing, let the left forearm rotate clockwise.
Both of techniques will open up the clubface, and make the leading edge of the club point more up in the air, as shown on picture nr. 2. Picture number 1. shows a very closed clubface, which is a disaster. Picture nr. 2 shows a very open clubface, which will make the club glide over the ground, but it will also launch the ball extremely high.
4. Let it go, let it go!
Now that we’ve made a proper backswing, lets move on to the downswing. A common thing that people have been told to do when chipping, is to keep the wrists totally still. I strongly disagree. You need to allow some freedom in your wrist, to enable a release of the club, in order to deliver the club in the right way at impact. Therefor, make sure of the following in the downswing:
• Let your hands and wrist move freely in the downswing.
• Don’t force the club anywhere, it should move in its own natural flow.
• Don’t be afraid of the movement feeling a little “wristy” if your are used to keeping your wrists totally stiff.
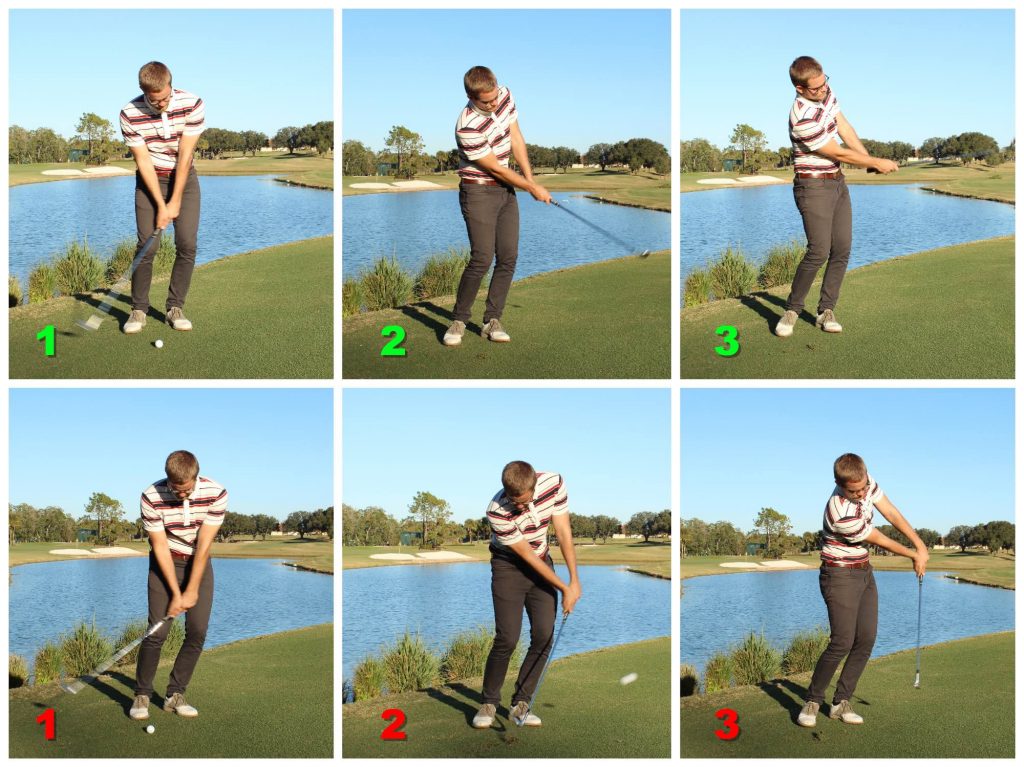
The below pictures shows a very stiff and non-releasing movement in the bottom of the picture, and on the top line you’ll see a more free release of the club through the ball.
5. Your Release needs Backup
As stated above, a release of the club is necessary in order to deliver the club in the right way. But a chipping motion only consisting of the wrist moving, is not to prefer.
Here is the deal:
You need to support the release of the club with a rotation of the upper body.
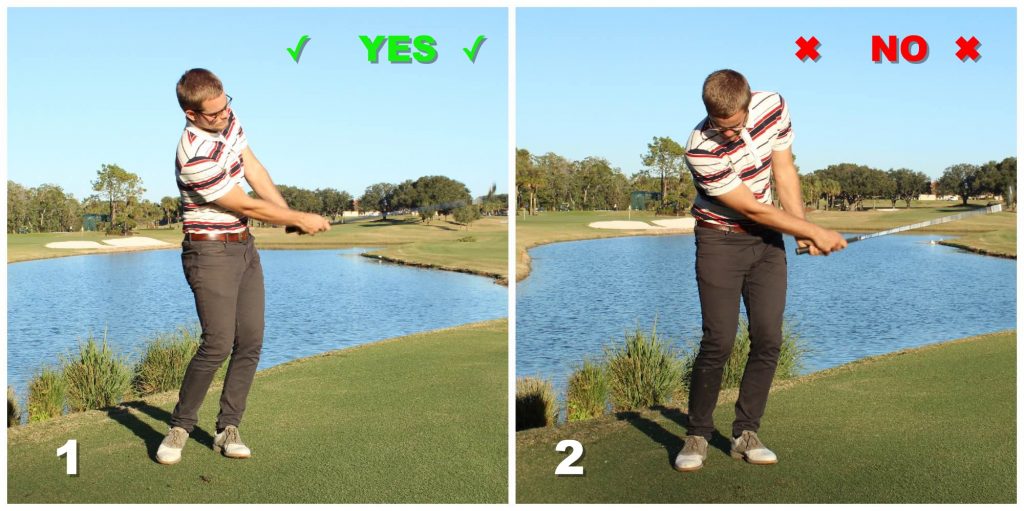
In the follow-thruogh the upper and lover body should be moving towards a position where they aim at the target. They may not turn that much, depending on the distance of the shot, but they certainly should be turning towards that. Picture 1 shows a correct turning of the upper and lower body. Picture 2 shows how it looks when neither upper og lower body turns in the follow-through.
6. Up up up
When I say up, I mean that certain parts of your body should be moving upwards in the motion. This is one of many misunderstood concepts in chipping.
Many people believe that the club should be moving downwards at impact, and that is also correct. But WHICH part of the club should be moving downward is something they dont think about.
Here is the kicker:
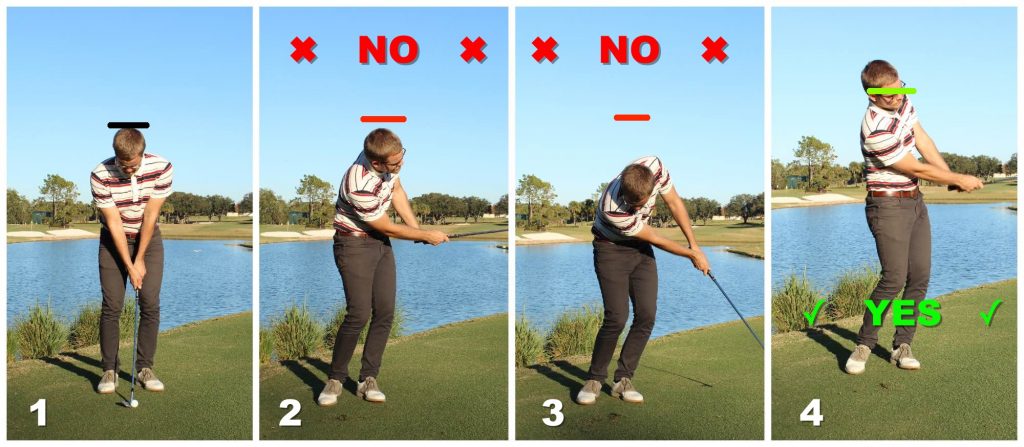
It is only the CLUBHEAD that should be moving downwards. The grip of the club should actually move upwards through the impact zone. If the grip also moves downward, the club will dig into the ground, and a lot of other compensations must be done. Therefore you must do the following to make sure that the grip of the club moves upwards:
• Your head should actually move up a little in the later parts of the downswing and through the impact zone.
• Your body should be slightly extending in the impact zone.
• Your shoulders should be turning which will help the left shoulder to rise through the impact zone.
If you do these things correctly, you will have a lot greater chance of having the club to glide over the ground at impact, instead of digging.
7. You’ve got to go forward!
You’ve made it through most of the motion, and we are now in the finish position. We’ve already been through a couple of the important elements in the finish, but we’re still missing one. The weight distribution.
• Your weight should be about 90% on the front foot (lead foot) in the finish position. (see picture 2)
• This serves to improve the control over where the club hits the ground.
Way to many amateurs falls back on the back foot (trail foot) during the motion (see picture 1) , and this ruins their low point and contact point control.
8. How far are you going?
A final component to add to the motion of a basic, mid-trajectory chip shot, is the swing length. Both in the backswing and in the follow-through. If you’re swing-length control is off it can cause problems for both lowpoint control, as well as distance control. Therefore:
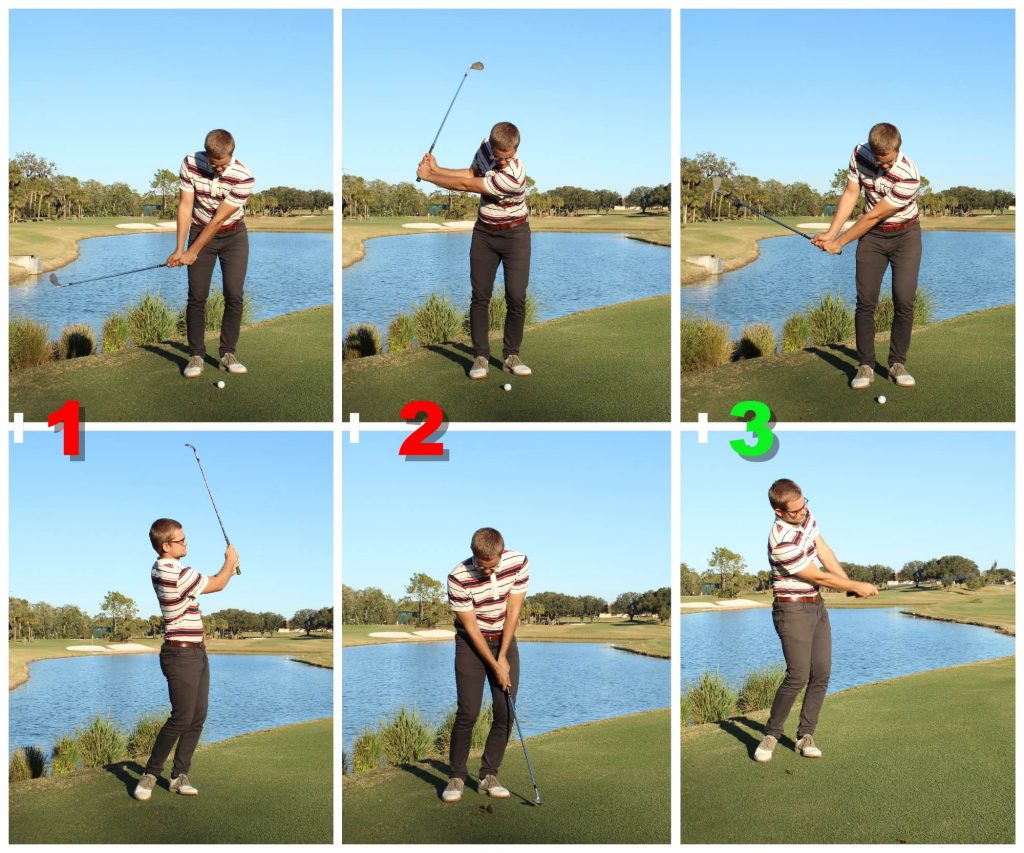
• Your backswing and follow-through should be about the same length. (Picture 3)
• A much shorter backswing than follow-through will force you to add a lot of energy to the club coming down towards the ball, which will lead to a lot of inconsistency in both contact and distance control. (Picture 1)
• A much shorter follow-through than backswing will force you to decelerate the club coming down to the ball, which will lead to the same issues as above. (Picture 2)
9. Please don’t kill the bird!
We have made it to the last extremely important factor when chipping. You’ve might not have thought about it, but grip pressure can be a major reason for bad chippers. A strong grip pressure will usually lead to:
• No release of the club, and therefore poor impact conditions.
• The club trajectory being manipulated during the swing.
• The grip of the club moving downwards for too long time.
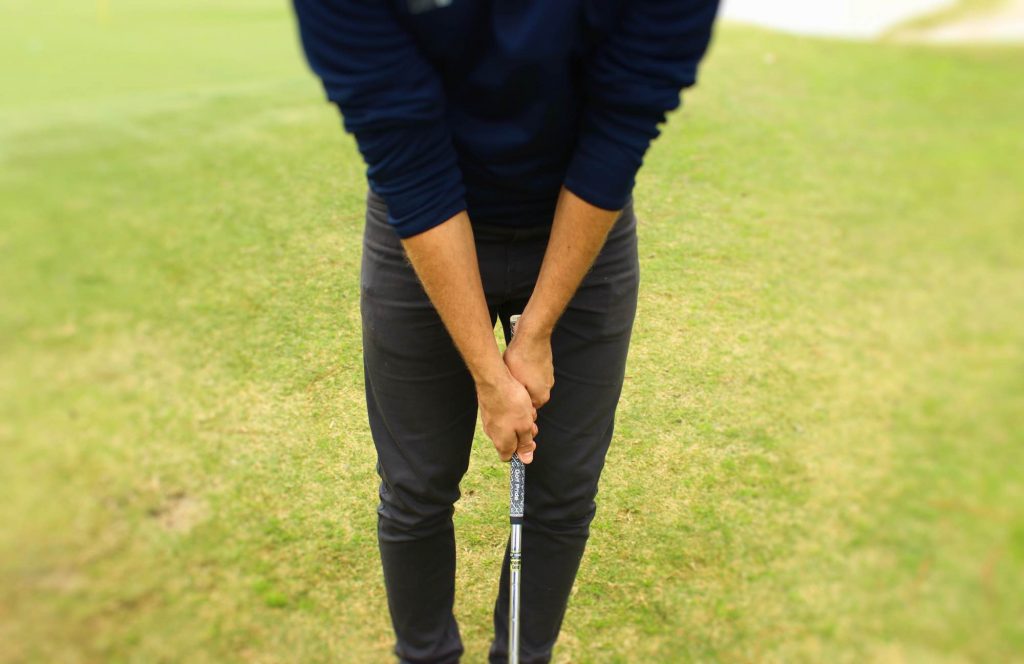
It can be hard to tell anybody to have a certain grip pressure, because it is a very individual ting. You can try the following drill to find your perfect grip pressure:
Your grip pressure is rated on a scale from 1 to 10. 10 is as tight as you can hold, 1 is as gently you can hold and not loose the club.
1. Hit 5 standard chip shots with a grip pressure of 10.
2. Hit 5 standard chip shots with a grip pressure of 1.
3. Hit 5 standard chip shots with a grip pressure of 5.
Now you should be able to fell which grip pressure is the best for you!
A good example of the motion described above: Henrik Stenson
You can watch many more examples on the techniques described above by going to the Swing Library
You’ve made it!
We’ve been through all of the 9 Best Chipping Tips! I hope some new information have been presented to you, and that you are ready to go out and test everyone of them!
For more content that can improve your Short Game performance, follow World Of Short Game on Facebook!
Swing on plane and hit better chip and pitch shots
Swing on plane and hit better chip and pitch shots
Do you have difficulties with the contact of your chip or pitch shots? Then it is likely that the way you swing the club back and forth causes theses problems.
What is the swing plane?
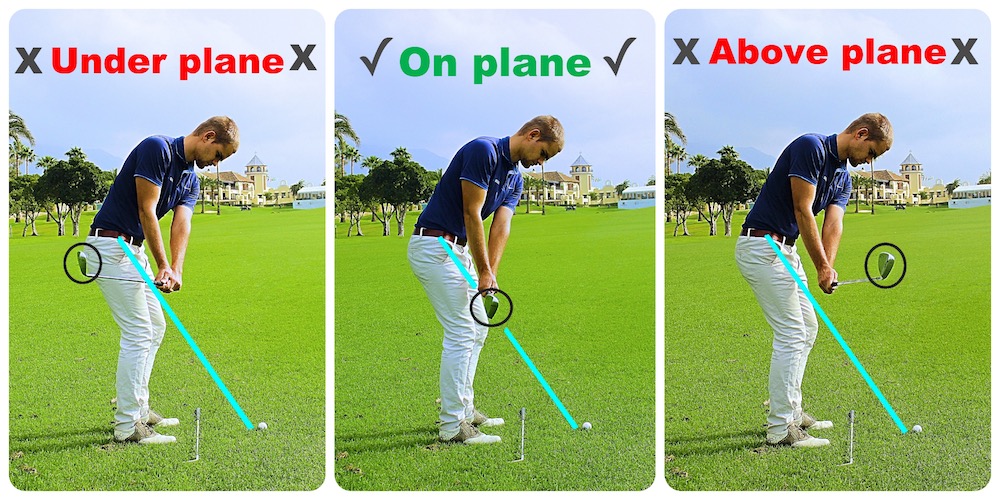
The swing planet is the “way” we would like to swing the club when chipping and pitching. The swing plane is the angle the shaft creates at setup. (see Figure 1). Exactly what this angle depends on many things and are not the essential. The essential thing is that the club head moves along this plane in the backswing, and on the way down again.
Why is it important to swing on plane?
There are several benefits that comes along with swinging on plane:
- The contact with the ball will be easier.
- You are much more likely to use the club properly if you swing on plane. A wedge is designed to help you if you hit a bit too early in the ground, and this help is reduced if you do not swing the club right back and forth.
- You have greater chance of being creative with your chip and pitch shots. With creativity I mean changing the height of the shot, and how much spin you hit.
- Unfortunately, the lie is not always perfect when chipping or pitching, and you need to be able to adapt to this. If you swing the club on plane, you have way better chances to adapt your swing to fit the many different lies you get when playing golf.

How do you know if you swing on plane?
There are several ways to check your own chipping and pitching motion. The easiest way is to use your phone, which is likely to have a camera built-in.
- Place a club on the ground pointing straight at your target and put yourself so the club is between your feet and the ball (see Figure 1)
- Get a friend to hold the camera so it is located in the same line as the club lying on the ground.
- Compare the recorded video and see how the club head moves back and forth. Use picture 2, 3 and 4 as reference points.
11 Golf Wedge Parts You Must Know
11 Golf Wedge Parts You Must Know
Do you know what bounce angle, the sole or the grind are, on a golf wedge? If not, keep on reading, and find out!
The golf wedge is designed in a very specific way, in order to help the player the most. In the following I will describe the different parts of a wedge, and what their function is.
1. Shaft
The shaft is the part that connects your hands with the club head. The shaft may vary in the type (steel or graphite shaft), the length, the weight, stiffness (flex), and where the shaft flexes (kick point).
2. Ferrule
This is just the little black plastic piece that sits where the club head stops and the shaft starts. It has no function, but is simply a visual part of the club. Some club-builders offer ferrules in costume colors! ;) 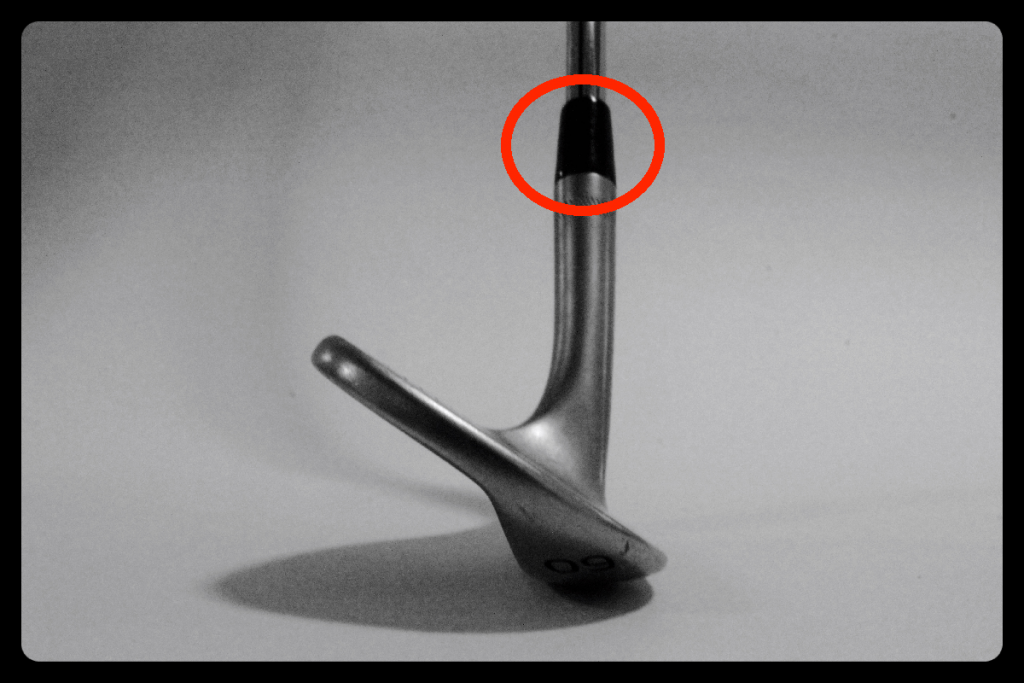
3. Hosel
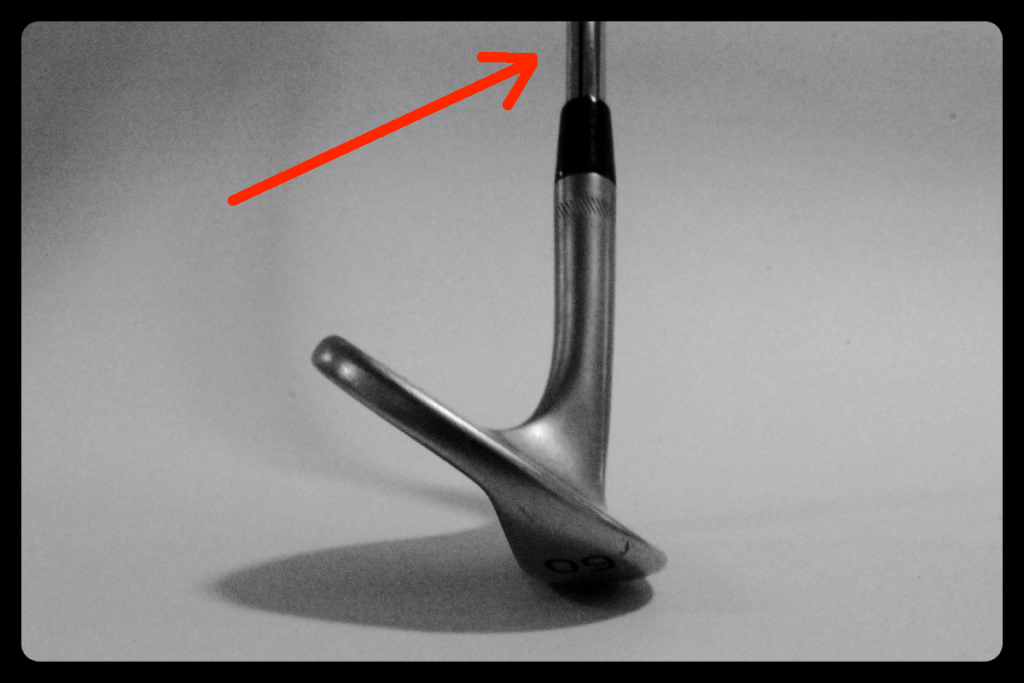
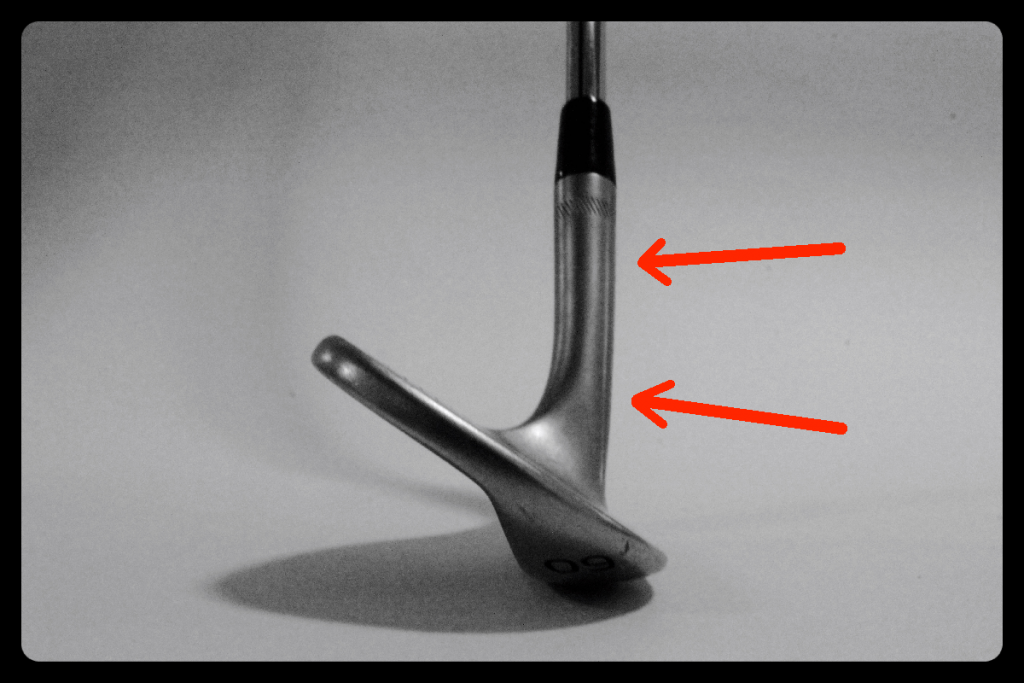
This is the part of the club head wherein the shaft is mounted. This is the part of the club were the ball is strucked when hitting a shank. The companies behind wedges experiments with different hosel length, to change the clubs performance.
4. Loft
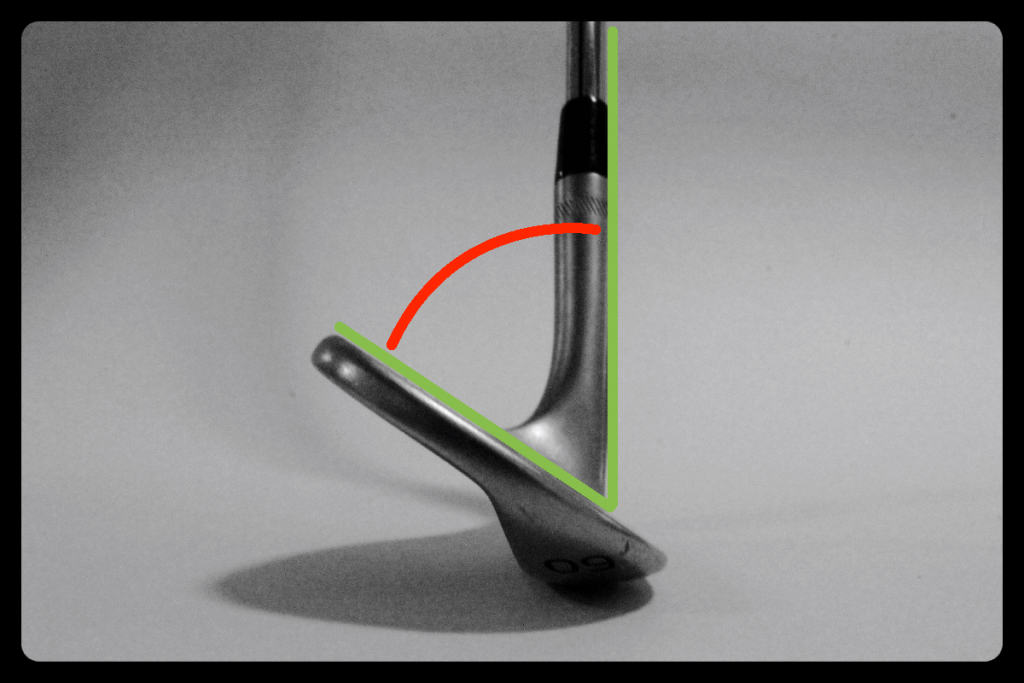
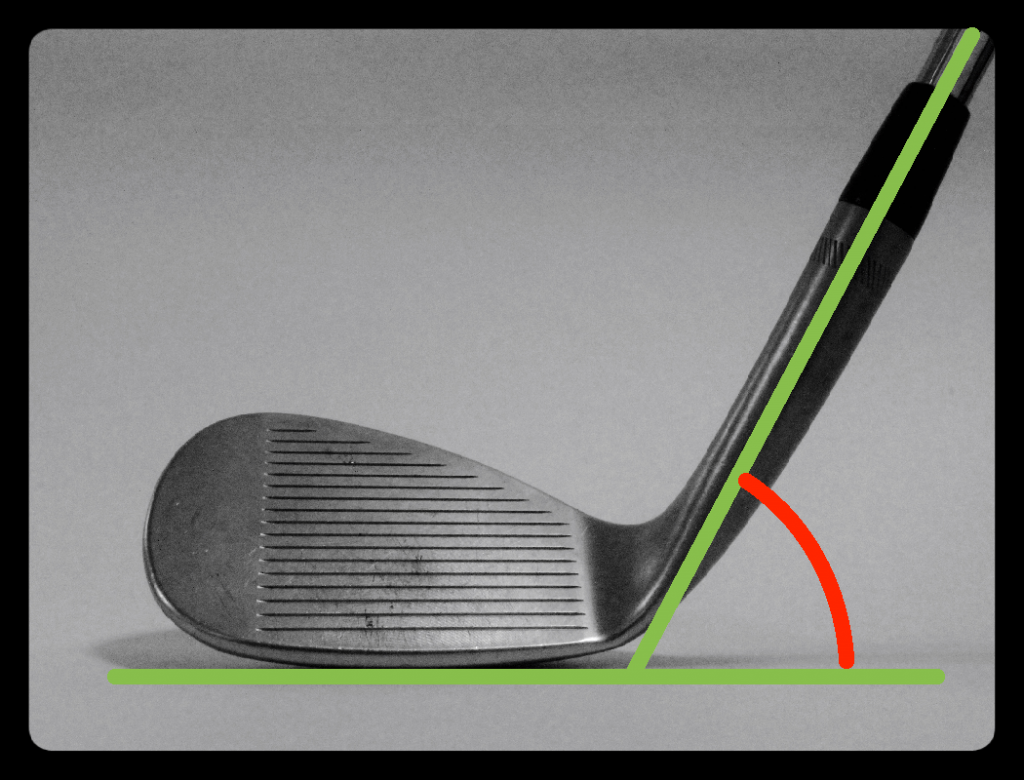
The loft on a wedge is the angle of the clubface relative to the shaft. The angle is measured when the shaft is vertical relative to a horizontal surface. This angle has an impact on how high and far you can hit the wedge.
5. Lie
The lie angle of a wedge is the club head’s horizontal orientation relative to the shaft. The lie must fit every individual player because it has a huge importance to the direction of the shot.
6. Bounce angle
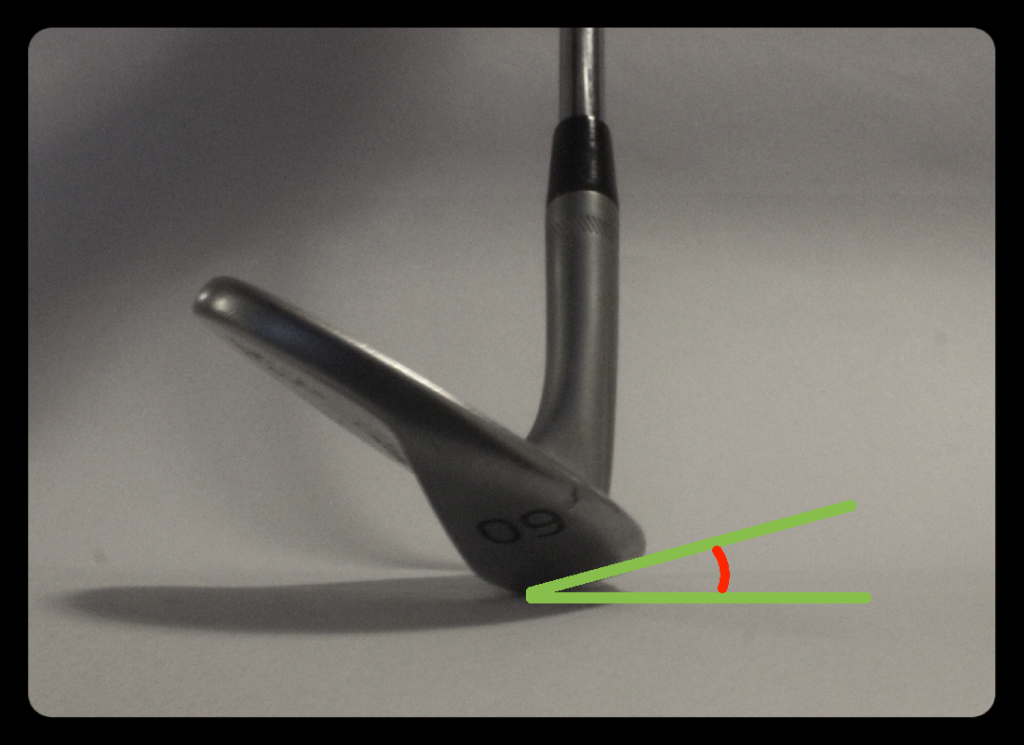
Bounce is an angle every wedge has. This angle is measured when the shaft is vertical, and with the club head positioned on a horizontal surface. The angle between the horizontal surface and the leading edge (see below) is the bounce angle. This angle serves to prevent the club from digging into the ground or in the sand. It would be enormously difficult to get solid contact on a short game shot without this angle. 4-degree of bounce is very little, and 15 degrees bounce is very high compared with the wedges that are sold today.
7. Leading edge
The leading edge of a wedge is the front and bottom edge of the clubface. This edge is very sharp on a wedge compared to longer irons and clubs. If the leading edge comes into contact with the ground to early, it increases the chance for the wedge to burrow into the ground, which will result in a shot that is way too short.
8. Sole
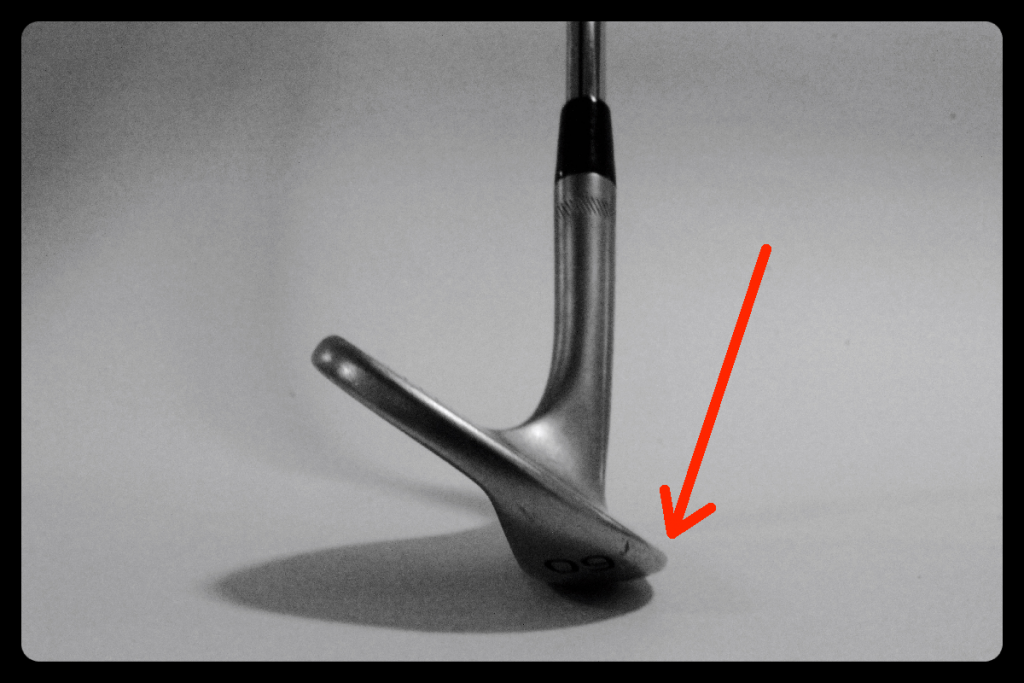
The sole of a wedge is the lower portion of the club head, located underneath the club head. This part of the club is essential in order to prevent the club from digging into the ground when the two meet. Imagine a wedge with a super narrow sole, it will have far greater tendency to burrow into the ground and get stuck than with a wider sole.
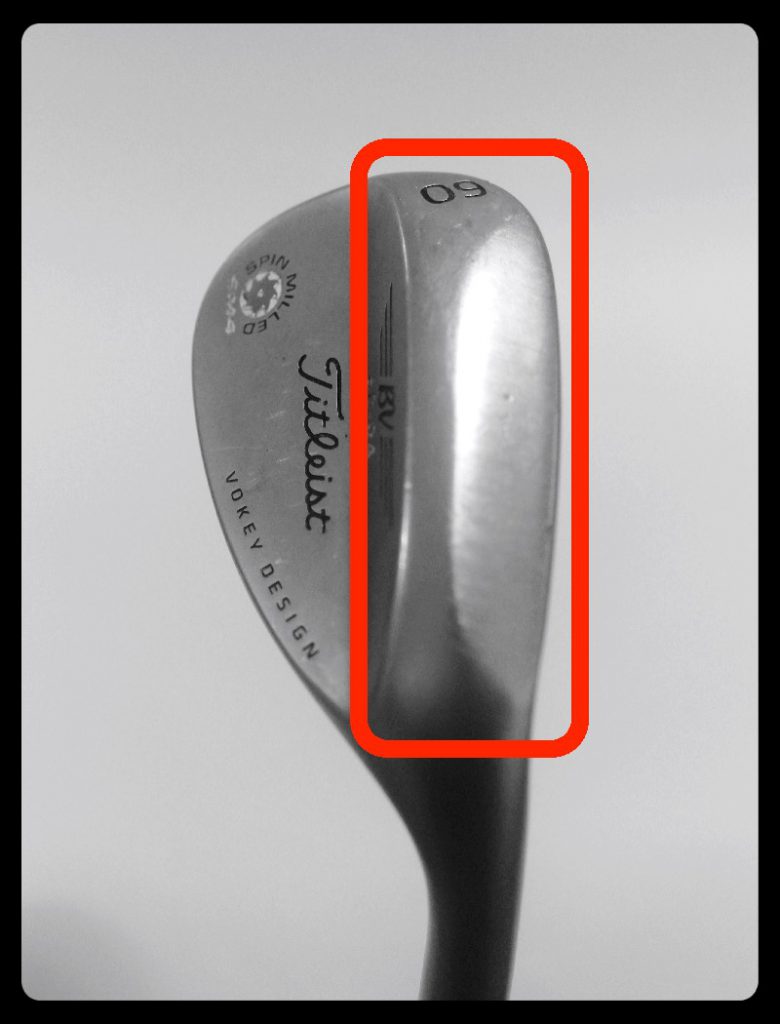
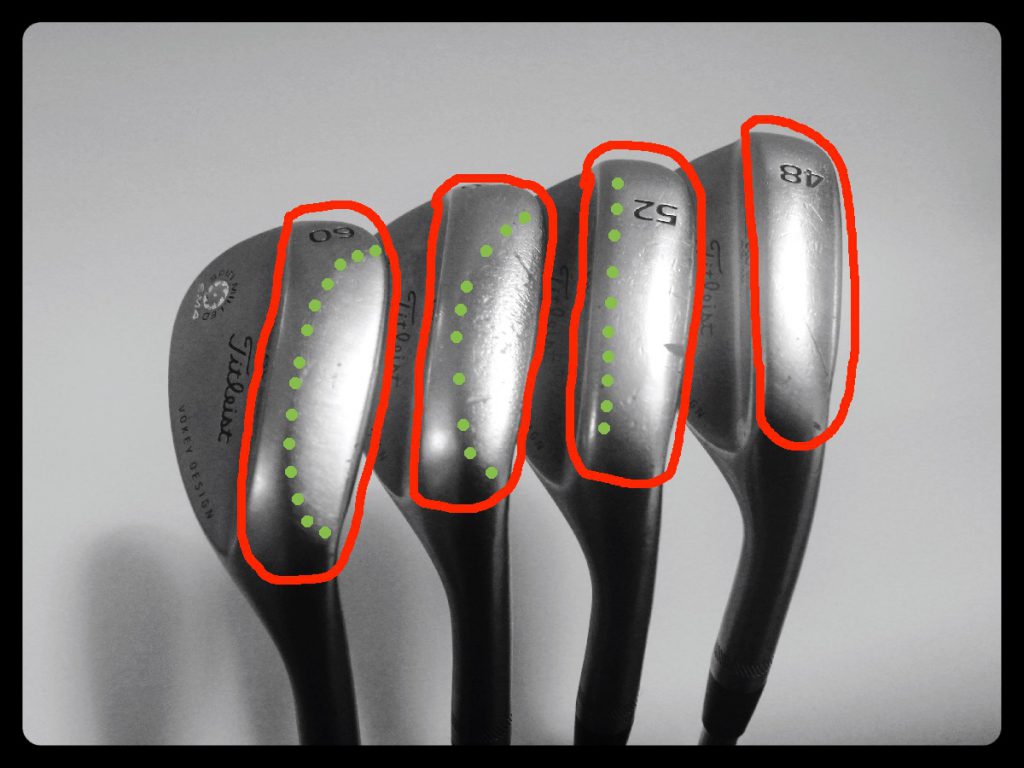
9. Grind
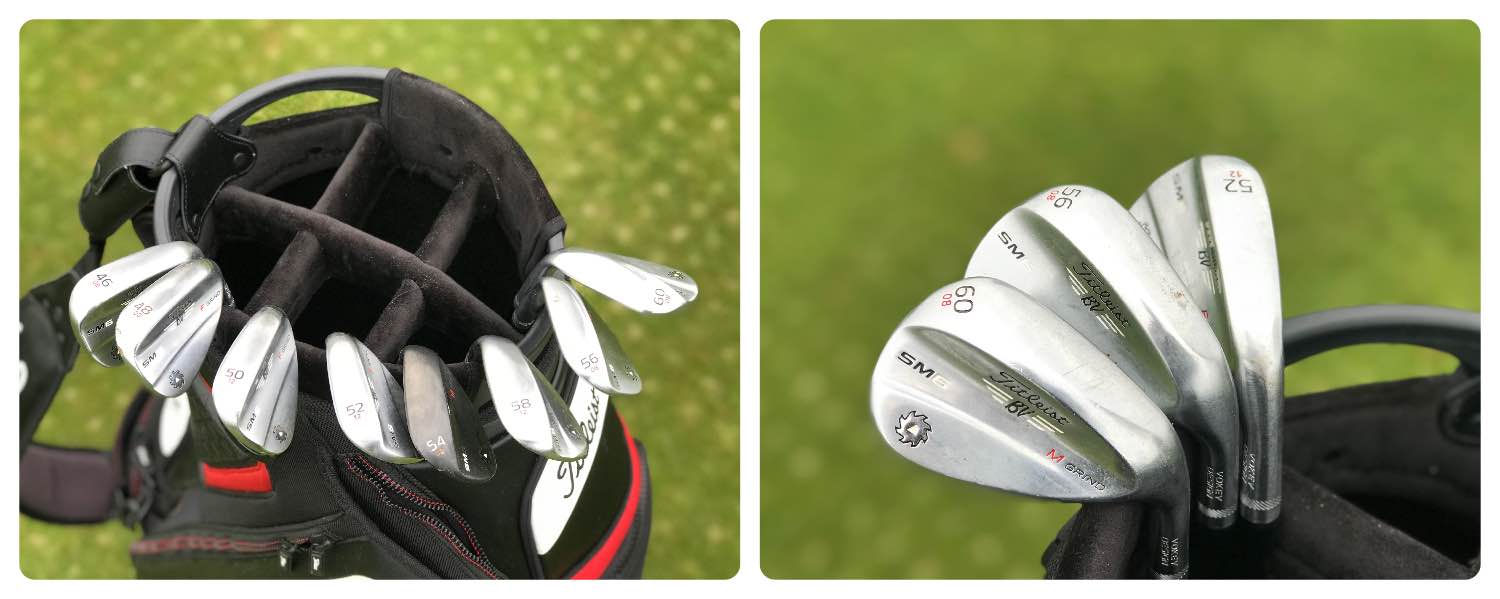
Grind is how the sole on the wedge is designed. It can be formed in different ways, it may be wide or narrow etc. On Titleist’s SM6 wedges there are L, S, K, M and F grind, each of which fits a different type of player, and also fits various types of course conditions.
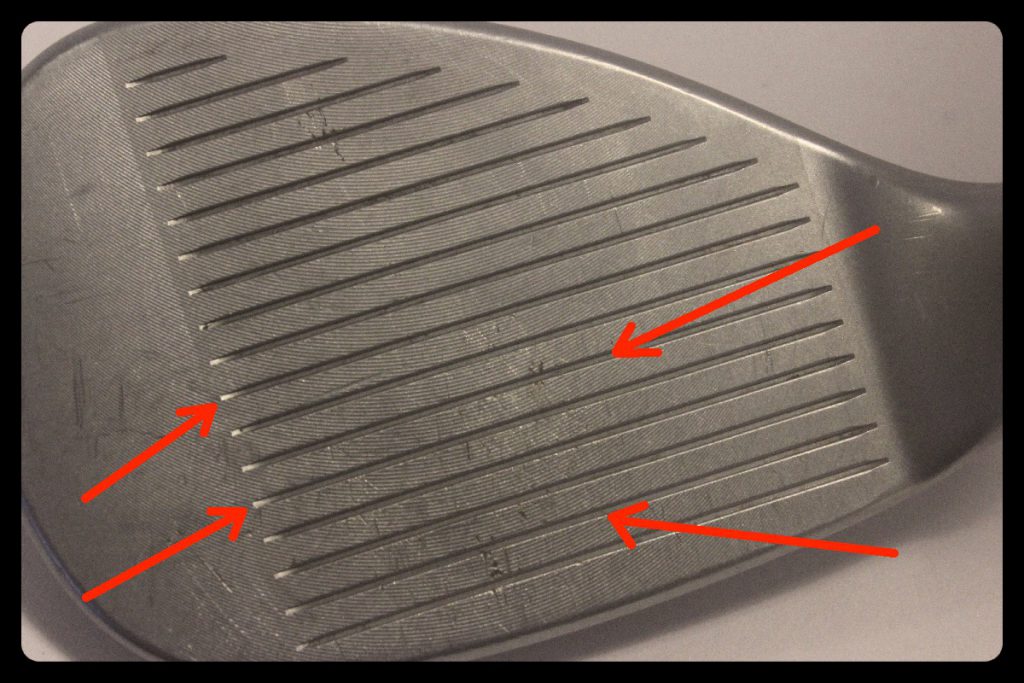
10. Grooves
The grooves on a golf club are located on the clubface, and are designed to create more backspin on the ball. Your sand-wedges grooves will typically be worn out earlier the the other wedges in your bag, because the sand in the bunkers is very hard on the grooves. Fresh groove is ABSOLUTELY ESSENTIAL in order to produce a decent amount of backspin.
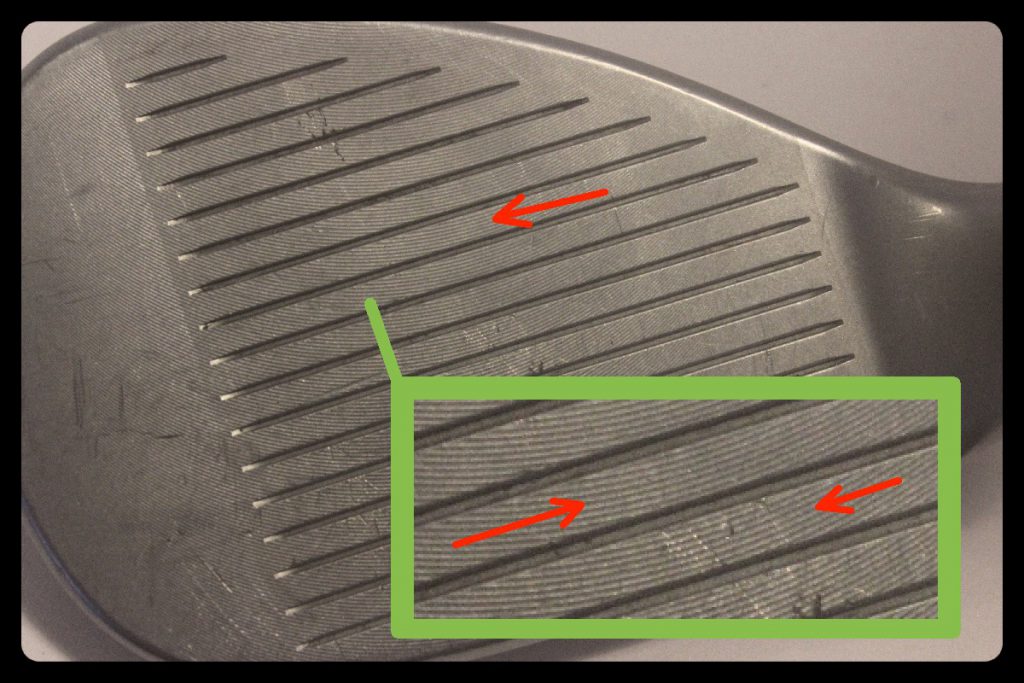
11. Milling
The milling on a wedge is the “mini grooves” across the clubface. These mini grooves are usually only seen on wedges. They are often designed in a curved shape, and can be difficult to see unless you look carefully.
Hopefully you have a little better understanding of what a golf wedge is made of now!
Now you just need to learn how to use it properly. Check out 9 Best Chipping Tips for Instant Better Performance Around the Green

